An idea for a project:
The living and dining places in our house are combined in 1 long room, with other rooms on either side. It has windows to the north and south, but doesn’t get much sunlight due to some trees near the south window. This is the reason it stays cool even in the midst of summer, which is nice, but it also means it’s darker and a bit colder in spring or autumn compared to other rooms that do get the sun inside.
That started me thinking…
What if i could place a mirror in our garden that follows the sun, and reflects its rays to a spot of my choosing. Let’s say, our dining room?
This is exactly what a heliostat is about. See what Wikipedia has to say about it.
In short, if we want to make a heliostat ourselves, this requires:
- A mechanical construct to hold the mirror and allow movement in 2 axis
- Motors to move the mirror
- A software running on a microcontroller that knows where the sun is, and knows how to steer the motors
Googling around
First hits
It seems there aren’t many examples of people building Heliostats themselves. One of the first ones i found was this one: Build a heliostat for solar heating and lighting.
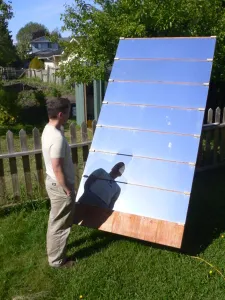
Now, that’s already a big one. I’ve seen the glass panels of our greenhouse flying through the garden during a storm, so i can imagine a sturdy mechanical design is needed for a Heliostat this size. Also, i don’t know if my family members or even myself, wants to stare into the sun every time we look outside the window. The sun itself is mostly high up in the sky, but the mirror is ground based, so there will definitely be a blinding effect when looking outside towards the mirror, even from an angle. I tested this with our bathroom mirror, don’t tell my wife ;-)
So no, let’s start smaller, in fact, let’s focus first on the software and electronics, and make a Heliostat with a small mirror. When we’re happy with the results, we can scale up the mechanical part.
A better algorithm
The article mentioned earlier also states that recalibration is needed every couple of days due to the software used, which is a big no-no for me. Calibration will be needed for every heliostat, but it should be a fire-and-forget procedure.
So, searching further i came across this site: Solar Position Algorithm. This algorithm promises a far greater accuracy. In fact, even too precise for our means, but hey… The sources are available for download, and are in C, allowing us to easily test them with for instance Visual Studio. I’m not going into details on this, but i can confirm after testing that the C code is working, and is able to predict sunrise times for the place where i live. This gave me confidence that the algorithm can also calculate the position of the sun across the sky. I also found references to commercial products using this algorithm, this gave me even more confidence.
Where to run the algorithm on?
With an algorithm available, it is time to decide on which hardware\code platform to run the algorithm on. I let myself be guided by these thoughts:
-
If this project is ever going to be a success, it has to be dead easy to use by all people under our roof, so things like hooking up a laptop to point it to a different spot in the house is a no-go. The ideal solution would be that my Heliostat can be controlled by a smartphone app, connected over Bluetooth.
-
I did played around with Arduinos and Raspberry PIs before, but i don’t like the programming environment of an Arduino, and running a full OS on a RaspBerry PI seemed overkill. I also remember SD Card issues when pulling the plug on the Pi. No, What i want is a device that i could switch on, that is more stable then a Pi , and that i could easily program and debug.
-
To steer the motors, we need PWM outputs, those are standard on most microcontroller boards. The motors need to position the mirror to an exact position. One way of doing this is by using a linear actuator with a potentiometer build in, so our boards needs ADC inputs, which are also pretty standard. These actuators require probably more current then a microcontroller board can deliver, so we need a separate motor steering.
After some searching i learned about the .Net nanoFramework. I’m using .Net\C# and Visual Studio for work already, and was surprised to find out that i could use the same tools, same debugging experience, with code running on a MicroController. It’s not 100% the same as the real .Net Framework of course, it’s trimmed down to allow running within the tight memory constraints of a MicroController, but, it seems you can still do very advanced stuff.
Finding a development board.
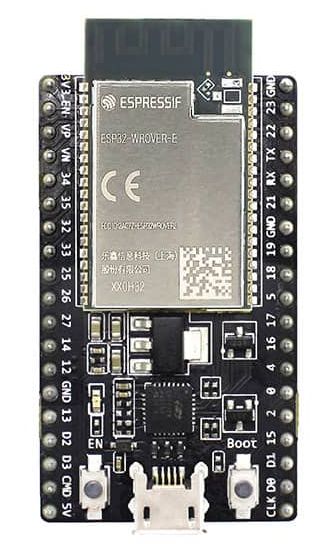
The people maintaining the .Net nanoFramework have a page with compatible devices. The most interesting for this project are the ESP32 based ones, like the one with the ESP32-WROOM-32E or the ESP32-WROVER-E microcontroller. Now, where i live if was easier to get the WROOM version, so that is how i started with this project. However, i soon discovered that the internal RAM of the WROOM board ( 512K ) was not sufficient for my needs, so after some time i switched to the WROVER version that has 8M of RAM.
So to get things straight, here is what i learned about the different boards you can buy:
| MicroController | Digi-Key reference | RAM | Antenna |
|---|---|---|---|
| WROOM | ESP32-DevKitC-32E | 512K | OnBoard |
| WROVER | ESP32-DevKitC-VE | 8M | OnBoard |
| WROVER | ESP32-DEVKITC-VIE | 8M | External |
Note that the pinout of the boards can be different! The WROOM board has an onboard LED, the WROVERs don’t. Also, some GPIO pins that are available on the WROOM boards are used to address the extra RAM on the WROVER boards. ( GPIO 16 & 17 )
The ESP32-DevKitC-VE is what i recommend to use for this project, you’ll need the extra RAM… Below is a picture of it.
Getting concrete
So to recap, this is a big project as we will be doing everything from scratch. To make it succeed, i drafted some phases the project needs to go through:
3: See if we can port the algorithm from C to C#, and if our board can run it.
4: Our code needs to be able to hold on to its configuration during power off, so we need an EEProm and battery powered Real Time Clock.
5: Create some simple mechanical construct to see if we can follow the sun. This will involve motor steering, but we’ll avoid the relative expensive linear actuators at first and use a workaround.
6: Create a simple smartphone app to see if we can replace our Bluetooth terminal app.
7: Do or Don’t: Scale it up to size.
That’s all for now, the stage is set, next post we’ll be setting up our work environment.
PS: This project is also ideal for keeping solar panels pointed directly to the sun.