Phase 4:
Now that we are capable of calculating the position of the sun, we want to get rid of the hardcoded values for the time and location. To save the time, we’ll use an extra piece of hardware, namely a Real Time Clock or RTC. The location we’ll store in the flash memory of the ESP32 board or in an EEProm. By doing so, we can power down the ESP32 board, bring it back up and still have correct values for time and location. And of course, we’ll add some commands to our Bluetooth interface so we can set all values from our smartphone.
Sources
The code for this blog post is available on GitHub - HelioStat AllPhases. This repository will contain the code for all phases of the project, just look inside the sub folders for the code of a specific phase. Note that the repository exists only to support the writing of these blog posts. The real repository, GitHub - HelioStat, is the one that you should report issues on or create pull requests for.
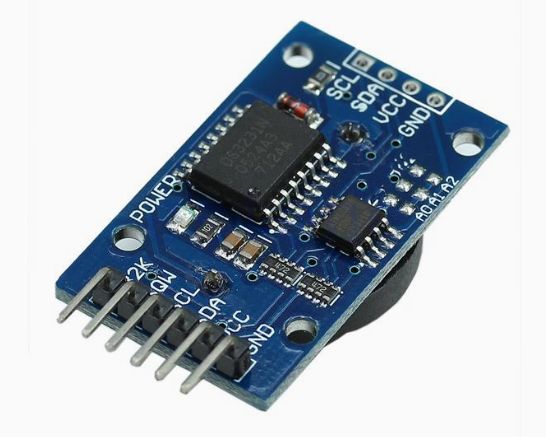
DS3231 Real Time Clock board
The RTC we’ll be using is the DS3231 chip, which has an I2C interface, and which you can get on a small PCB with some pins for the I2C signals. The board has a battery holder on the back, and as a nice extra also has a I2C compatible EEProm. This EEProm is an AT24C32 and has 32K bytes available.
Saving to flash or Eeprom
When i started writing the code for this post, i was actually unaware that you could use part of the flash memory of the ESP32 board to store something. So, i was quite happy that the DS3231 board came with an onboard EEProm. Later, i added the code to use the flash. Both methods for storing settings are still available, and you can select one when configuring the Dependency Injection container.
Code changes when compared to Phase3
Working with the RTC
Preparations
All the low-level code for talking to the DS3231 chip over I2C is taken care of by the Nuget package ’nanoFramework.Iot.Device.Rtc’. Once you add this to your code, you have the Ds3231 class at your disposal to easily set and read the time. I did created a generic interface IRealTimeClock and an implementation to wrap around this Ds3231 class. So if you have a different RTC in your project, you can have a specific implementation for your RTC. The code is below.
Note that the constructor takes the I2C address of the DS3231 chip, and the I2C bus number. The creation of this class is done by a factory class:
We’ll use a factory class as different types of RTCs might require different constructor parameters, but we want to remove that implementation specific code from the Dependency Injection ( DI ) container.
The configuration looks like this, note that we do register the factory class, not the actual implementation.
Of course, before we can use any I2C device, we must enable the I2C pins of the ESP32.
Setting and getting the time over Bluetooth
2 New commands are added to our growing list of commands. First one is the settime command of which you see the ‘Execute’ method below. When sending the command over Bluetooth, you are expected to give the exact time in UTC. That last part, UTC, is important, as the algorithm that calculates the position of the sun also expects the time to be in UTC. Note that we ask our DI container for the factory to create the RTC.
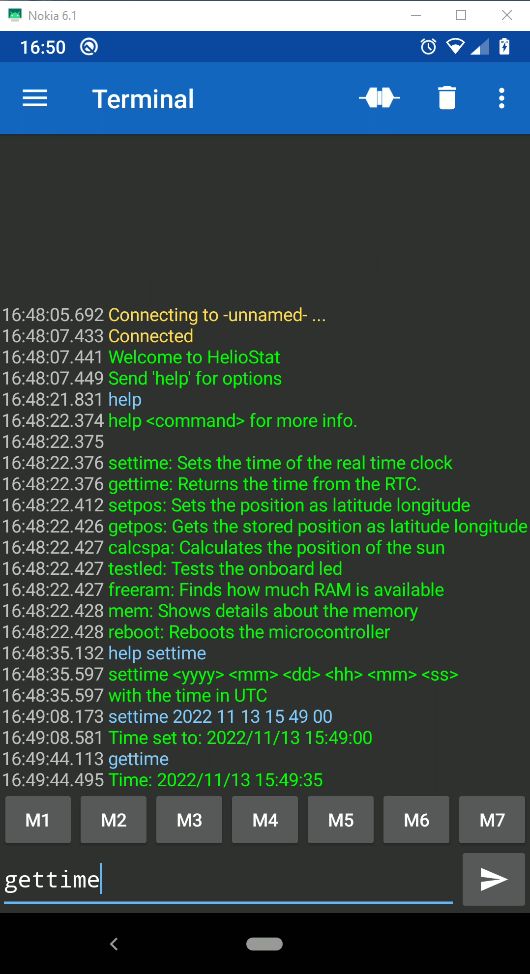
Demo
Below is a screenshot that shows setting and getting the time. Note that we have nice ‘help’ commands that can remind us what syntax is expected.
Storing the location
Our location is defined as latitude & longitude, 2 double values. These values we now need to format in a way so that we can store them in an EEProm or flash. I did choose to group these values, and any future values, inside the settings class.
The ‘formatting’ of the values in this class is done by serializing the public properties of the class to a json file. It is this file that we will eventually store.
If you want to use a different way to serialize your settings, then you can, as the json serializer inherits from interface ISettingsStorage. If we look at the code above, then we see that first the instance of the settings class is serialized to a string. Next, we ask the DI container to give us an implementation of the IEepromFactory, after which we create an instance of the IEeprom class. This class can either be an implementation that writes to the EEprom on the DS3231 board, or the flash of the ESP32 board. Which one is used is configured in the DI container.
Using the internal Flash of the ESP32 board
The class ‘InternalFlash’ is responsible for writing and reading to the internal Flash. Note that this is made very easy by the .NET nanoFramework, as you can treat this flash as a folder just like you would when accessing a folder on your desktop PC. Below we show the how this class is writing data. It may seem funky at first, but that is because this class inherits from the interface IEeprom, where you rather work with byte buffers and memory locations. So every time you write some data to a new memory location, a new file is created with the filename set to that memory location. Still funky i guess :-)
Using an Eeprom to store data
Let’s take a look at how this interface is implemented for writing to an actual Eeprom. This is done in the ‘AT24C32’ class, of which we again show how data is written. The raw writing over I2C is again taken care of by some .NET nanoFramework library. It is this library that takes an address and byte buffer when writing data, hence the funky interface.
Setting and getting the location over Bluetooth
Again 2 new commands are added, ‘setpos’ and ‘getpos’. Setpos takes the latitude and longitude.
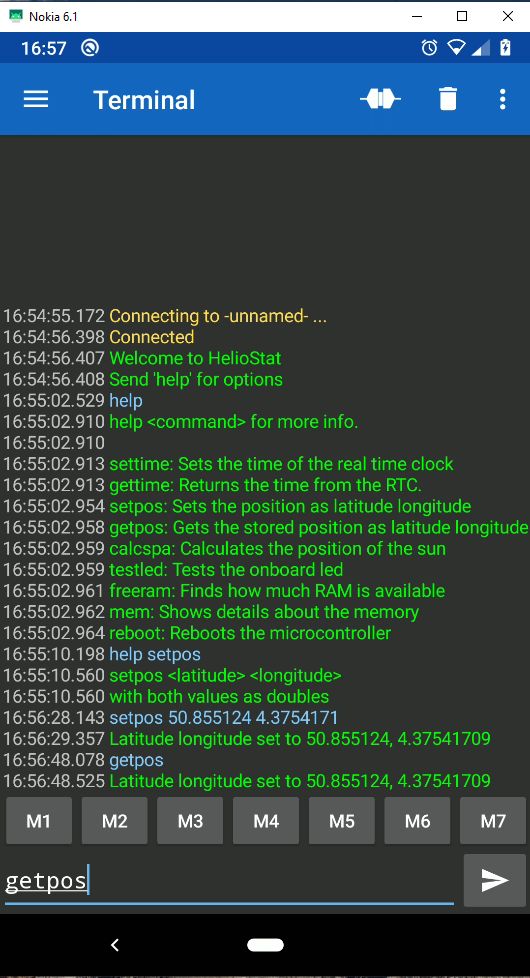
Demo
Below is a screenshot from the smartphone terminal app while we’re setting and getting the position.
Reading the settings at startup
Now that we know how to write and read the settings of our application, let’s see how we use them. At startup, we read the settings from flash or Eeprom, and store them in the Settings class which the DI container treats as a singleton.
This means that later, when we for instance want to know the location, we’ll access that Settings class in the ram of the ESP32. This is certainly more performant then always reading them again from flash, and it’s also a bit nicer towards the lifetime of the flash or Eeprom.
Letting the algorithm use the stored settings
Finally, we can get rid of those hardcoded values for the time and location. We ask the DI container for the instances of the RTC and Eeprom, and use them to get the current time and location.
Conclusion
We added quite some code and even hardware, to always have the current time and location available, even after powering down our device. With this in place, it’s time for the real fun to begin. In the next post, we’ll add hardware to control the motors that will move our mirror. As a proof of concept, we’ll connect the motors to a toy version of a Heliostat, to see if we can follow the sun.